This action is destined for automation of filling web forms. Of course you can automate filling forms by "Send Keystrokes" and mouse actions. But unfortunately, this is much more difficult and unreliable, because RoboTask tries to influence your external application (your web browser) and can’t control the reaction of the program to this influence completely.
"Fill Web Form" works differently. It loads the web page with a form under its control, waits for a full loading of the page and can fill a form on the inside. If auto-submit is performed, the action will be waiting for the end of the resultant page loading. Thereby it is guaranteed that the task can pass to the next step only after the end of the page loading.
After filling the form you can keep on interactive working with the site (see the action "CEF Wait For Done") or close embedded Web browser.
The embedded web browser will be in of memory only during the work of a task. RoboTask will unload the object "embedded web browser" out of memory after the end of the task or in case an error appears.
Genearal options
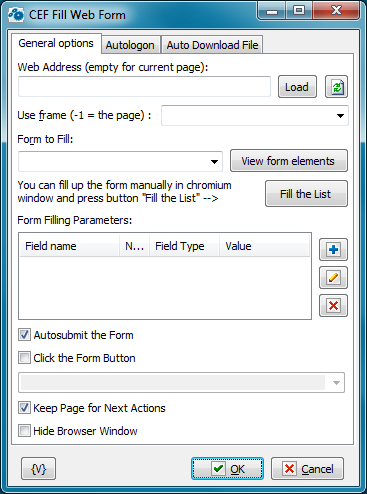
Web Address
Fill the web address of the page which needs loading. You can leave its field empty if you want to use the page which was loaded in the previous steps of the task. You can use variables.
On the right of the field there is the "Load" button. When you press it, the specified address will be opened in embedded web browser. After loading, there will be available the lists of forms, elements of a form and the lists of item values kind of "Select" and "Multiselect".
After the form loading into embedded web browser, all the visual elements of all forms at the page will have pop-up hints, where the next information will be specified:
•The name of a form
•The name of the field
•The common ordinal number of the field
•The type of the edit field
Use Frame
Specify frame number (from 0) . "-1" corresponds to the page. The action uses any non-numeric string as "-1". If you input invalid number then you will get the error "Frame not found".
Form to Fill
The name of a form that you should fill. You can choose the name of a form from the drop-down list if you have loaded the page. You can also fill the name of the form manually. You can use variables.
There may be nameless forms on any pages. This is allowed by the HTML standard. In this case you can refer to the form according to an ordinal number in the list beginning from 0. In other words, the first form on the page will have the number 0, the second – 1, and so on.
Fill the form
After loading the web page in embedded web browser, you can fill the necessary form on the page manually, then press the button "Fill the List". After confirmation, an editor will fill the field list from the chosen form.
After auto filling, you can edit the list manually: to add/delete elements or to change the elements that are existing.
Form Filling Parameters
A parameter list for a form. You can edit a list using buttons on the right. (See "Add or Edit Web Form Parameter dialog")
Autosubmit the Form
Turn on this checkbox if you want to submit a form automatically after filling. By default this parameter is turned on. If auto-submit is performed, an action will be waiting for finishing loading of the resultant page. Otherwise, you need to submit manually. In this case the next step of the task must be the action "Wait for Done" and then performing necessary actions manually. This can be useful if you need to input the value CAPTCHA before pressing the button "Submit" or to perform any other interactive actions.
Click the Form Button
To reproduce a button click on a web form, switch on this checkbox and select the button name from dropdown list or input it by hand.
Keep Page for Next Actions
Turn on this checkbox if you want to leave the resultant page for interactive work or for filling the next form. By default, this parameter is off. If this parameter is turned off, embedded web browser will be closed immediately after the end of the step.
Hide Browser Window
To ensure hidden work of the web browser window, switch on this checkbox. In this case the browser window is not visible on the screen.
Autologon
You can specify parameters of automatic authorization on this tab if WEB browser demands authorization for access to resource. This way of automatic authorization works only with Basic and Digest authorization modes. In this case browser demands to input a user name and a password into the pop-up system window. If you specified parameters of automatic authorization, the action puts the parameters automatically when browser demands authorization.
If it is necessary to input the authorization parameters into the form on a page, then it is the so-called cookie authorization. In this case you should use the automatic filling of WEB form.
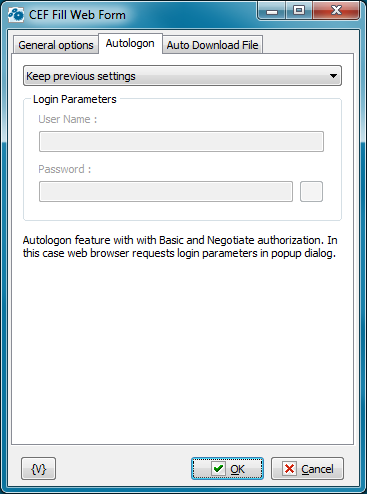
Autologon Mode
There are three options
•Keep previous settings
•No autologin (manual login) - user have to login manually when web browser ask username and password
•Enable autologin. Set username and password.
User name
A name of a user for authorization. Variables can be used.
Password
A password for authorization. Variables can be used.
Auto Download file
On this tab you can tune parameters of automatic file downloading from a site.
For example, this mode is useful for automation of file downloading from the zone protected by a password. It occurs approximately in such a way:
•You specify URL of a file.
•When you try downloading a file, the browser demands a password or redirects the request to the Login form subject to the authorization mode on the site.
•When a password is requested, it is necessary to set up Autologon. When the request is redirected to a form, you should perform the automatic filling of the form.
•After you input parameters of authorization, the file will be downloaded into the specified folder automatically.
Auto-download mode
There are two options
•Keep previous settings
•Change download options - set the folder name and overwrite parameter.
Default download folder is %temp%\cefdownloads
Download Folder
Specify the folder in which the file will be downloaded automatically. It will be downloaded with the file name by default. Default value is %temp%\cefdownloads
Overwrite File If Exists.
Switch on this checkbox if you want the action to overwrite a file, on condition there is a file with the same name in this folder. Otherwise the downloaded file will be renamed. Default value id OFF
![]() Actions are
Actions are