The Take Screenshot action captures images of web pages or specific elements. It can save to clipboard or file in different formats.
When to use this action:
Documenting automation results for reports
Monitoring visual changes on websites
Capturing evidence of successful transactions
Debugging headless automations - save screenshots at key points to verify what's happening
Creating visual logs of automated processes
Capturing error messages or confirmation screens
Archiving time-sensitive content (prices, availability)
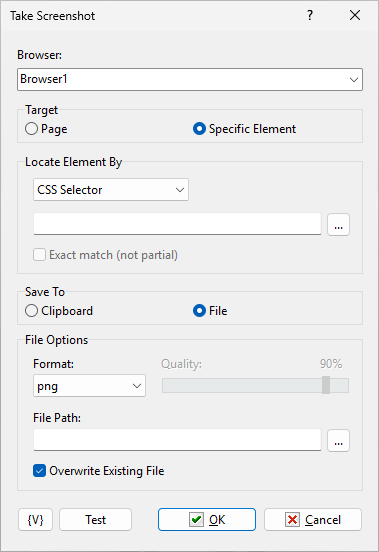
Browser
Select which browser to capture from
Target
Choose what to capture:
•Page - Capture the visible page or entire page
•Specific Element - Capture only a selected element
Full Page (only for Page target)
When unchecked: Captures only the visible viewport
When checked: Captures the entire page including scrolled content
Useful for long pages, articles, or full reports
Element Selection (only for Specific Element)
Locate by: Choose how to find the element
Select Element: Click to interactively choose
The screenshot will include only this element
Save To
Choose where to save the screenshot:
•Clipboard - Copy to Windows clipboard for pasting
•File - Save to a file on disk
File Options (only when saving to file)
Format:
•PNG - Lossless format, best quality, larger files
•JPEG - Lossy format, smaller files, adjustable quality
Quality: (only for JPEG)
Slider from 1% to 100%
Higher quality = larger file size
90% is usually a good balance
File Path:
Full path where to save the file
Use [...] button to browse
Can use RoboTask variables: C:\Screenshots{Date}.png
Overwrite Existing File
When checked: Replaces existing files silently
When unchecked: Action fails if file exists
![]() Related Topics
Related Topics